EQUIPMENT SPOTLIGHT: Building a Keezer

EQUIPMENT SPOTLIGHT: Building a Keezer

This month I thought we could shift gears and talk about a project you can do at home, have a lot of fun, and serve up your tasty homebrewed creations. So, you’re ready to graduate from bottling everything and start serving keg beer at home, but are wondering how people can have multiple taps of beer? One cost effective and quick way is to build your own keezer.

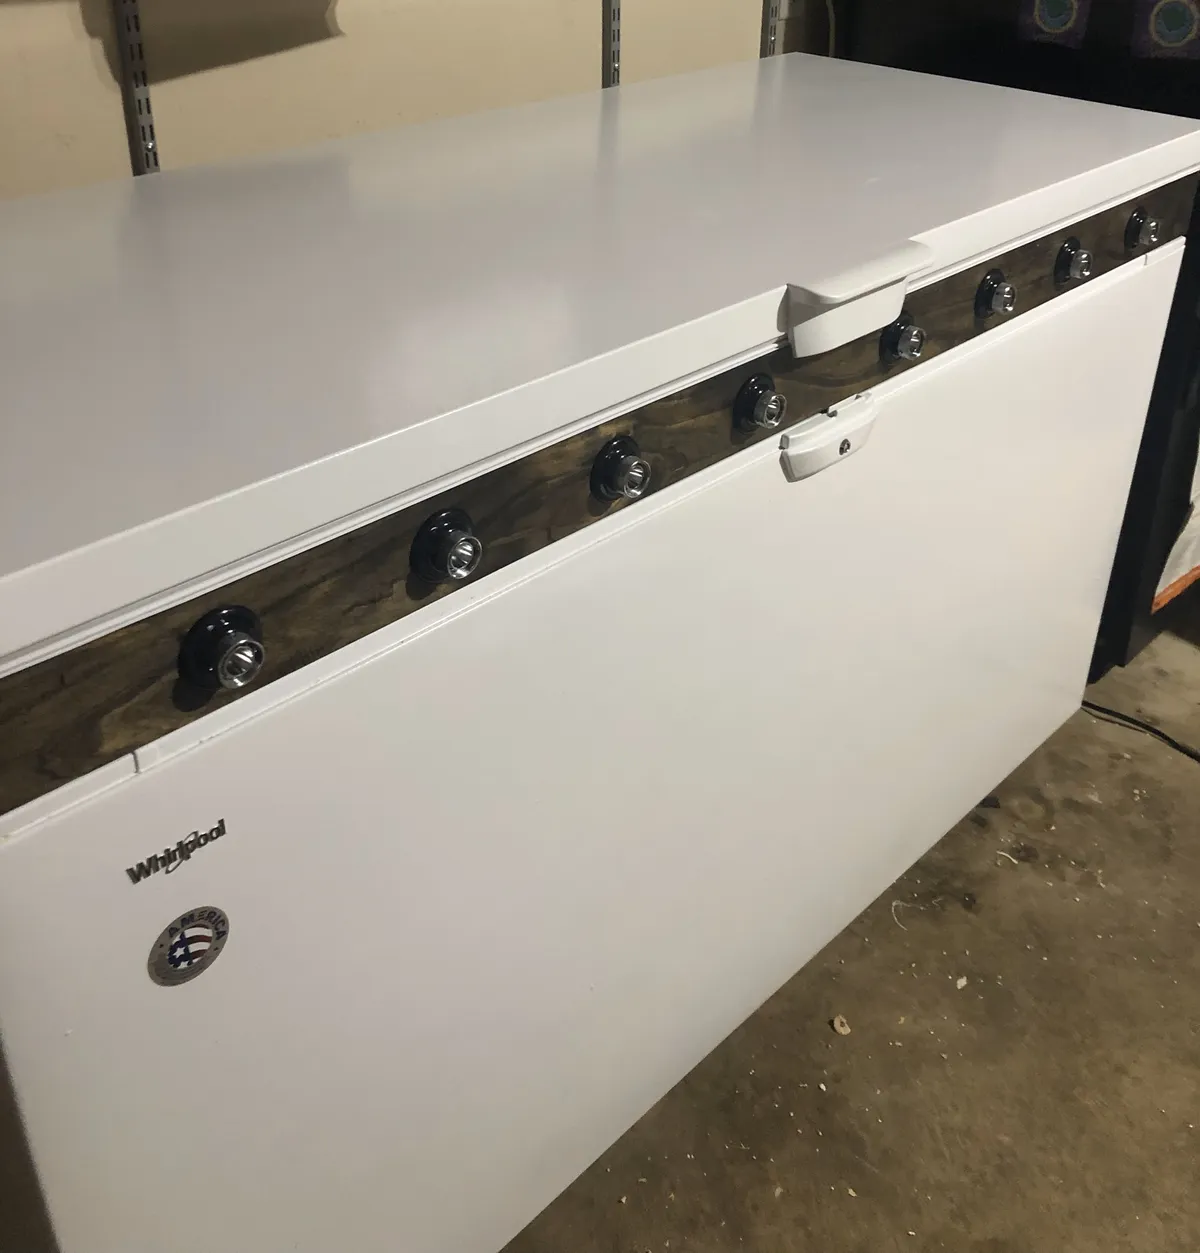
So, just what the heck is a keezer.? In simple terms a keezer is a freezer that has been converted to refrigerate and serve beers. Cool idea, right? Well, here are some guidelines to build your own keezer.

Step 1: Plan your build

You will need to decide the following before you get going. First of all, how many kegs will you be serving and will you plan to expand in the future? This will determine the size of your chest freezer, number of faucets, shanks, lines, and fittings you will need. Will the unit be going inside or outside like a garage? You might think who cares? But it is quite important to get a garage-ready unit if it will be outside, especially in this Texas heat. Feel free to ask me how I know over a cold beer.

Step 2: Source your parts

Now that you have determined what kind of unit you want to build, it’s time to source and secure the components. You will need the following parts to build and run the unit:

  • A chest freezer.
  • A temperature controller that basically tells your unit that is designed to be a freezer to behave like a refrigerator. This unit works by plugging the freezer into the controller and the controller into the wall. A temperature probe goes down inside the keezer and turns your unit off and on to meet a preset temp.
  • On the gas side you will need a CO2tank, regulator, splitter to accommodate the number of kegs you will be serving, gas fittings for the number of kegs you’re serving, and a gas line.
  • On the liquid side, for the number of taps you plan to build for, you will need faucets, shanks, liquid line, liquid fittings, and plenty of line to shank the fittings.
  • Lastly, enough wood to go around the perimeter of the freezer to create a collar. We will talk more about this in the next step.

Step 3: Build the collar

For this step you will need to remove the chest freezer lid and build a rectangle wood collar on top of the freezer. Then, reattach the lid on top of the collar. This can be made of 2’x4’s or any type of lumber really. You need to do this step because you can’t drill holes in a chest freezer for your beer faucets. Refrigerant lines are running throughout the sides of the freezer. And if you puncture one, you’ve destroyed it. The wood collar allows you to drill holes for your faucet shanks without hitting refrigerant lines and adds height for keg clearance to your kegerator. Once you cut the boards to make the collar, use metal corner brackets to hold the boards together. You might also use some weatherstrip to go between the bottom of the collar and the freezer. The top will seal with the freezer lid. After the collar is built you can reattach the freezer hinges to the collar and drill enough holes for the number of shanks/taps.

Step 4: Assembly

Now it’s time to put your creation together. First, put the shanks in the holes you drilled in the collar and tighten. Next, attach beer line to the shanks using beer nuts. Each beer line will need a liquid fitting attached as well. For the gas side, attach your splitter to the back wall of the collar, run a gas line to your regulator, and attach your regulator to yourCO2 bottle. Then, run a gas line from every port on the splitter and attach a gas fitting to each line. On the outside attach a faucet to each shank using a faucet wrench.

Step 5: Party time

Turn your temperature controller on and set to your desired serving temp. Set your regulator to 10-12 PSI for serving. Hook up your kegs to the gas and liquid connections and throw a party to break in your new toy! You can also bottle all your award-winning beers straight from the tap!

Note these systems need balance so considerations like PSI, and line length can be important to keep foaming at a min.

Remember you can be as simple with your design or as detailed as you like based on your skill level, but the main thing is functionality. A good keezer build can make life better for you but a bad build can do quite the opposite. Don’t be afraid to ask for help, but the main thing is to have fun!

Cheers!

— Jarrett Long, Club Treasurer
Related Posts

All things Oktoberfest

All things Oktoberfest

It’s September! There’s a refreshing crispness in the air, and that means one thing-Oktoberfest is just around the corner. This month will be one long party of giant pretzels, brats, German music, and

read more
Cold days mean hot beers

Cold days mean hot beers

Q: I saw a viral social media post of people putting red-hot pokers into their beers to caramelize them. Does that actually do anything? A: It’s a tradition that allegedly goes back hundreds

read more
Caramel and Crystal Malts

Caramel and Crystal Malts

Caramel malt is a staple in a wide variety of beers worldwide, and is used to add color, flavor and sweetness to beer. Note that the terms Crystal and Caramel malts are used interchangeably.

read more
STYLE SPOTLIGHT: Cream Ale

STYLE SPOTLIGHT: Cream Ale

With our Spirit of ‘76 All-American homebrew competition in full swing we thought we would take a moment to showcase an American beer style, talk about its origins, and how to brew a good example of o

read more
Beer Clarity and Finings, Part 2

Beer Clarity and Finings, Part 2

Last month we covered how to measure beer haze and some of the major causes of beer clarity issues. This month we're going to go in-depth and discuss yeast, proteins and tannins and begin to cover how

read more
What Are Cryo Hops?

What Are Cryo Hops?

Here are the slides from the discussion that Gerg lead at the February 2025 meeting

read more
Beer Clarity and Finings, Part 1

Beer Clarity and Finings, Part 1

This is a detailed series on beer clarity and finings. In this first we are going to cover what beer clarity is, how it's defined and measured and the potential causes of haze or clarity problems in b

read more
Beer Clarity and Finings, Part 3

Beer Clarity and Finings, Part 3

This is the third part of my four part series on improving beer clarity. In the previous sections we discussed how to measure clarity, causes of poor clarity, proteins and tannins and how to control a

read more
Beer Clarity and Finings, Part 4

Beer Clarity and Finings, Part 4

In the previous sections we discussed how to measure clarity, causes of poor clarity, proteins and tannins and how to control and improve beer clarity in the mash and the boil. Today we’re going to di

read more
Freezing Yeast

Freezing Yeast

Here is a link to the slides Greg used for his talk about freezing yeast

read more
EQUIPMENT SPOTLIGHT: Keg Maintenance

EQUIPMENT SPOTLIGHT: Keg Maintenance

Maintenance of your kegs isn’t always the most glorious part of home brewing, but it is one of the most important practices for sanitation, extension of the life of your equipment, and can go a long w

read more
March? October? September? What’s with the German beerfest calendar?

March? October? September? What’s with the German beerfest calendar?

Q: Why do we drink March beer (Märzen) at Oktoberfest in September? A: There’s no beerfest quite like das original — Oktoberfest. Lederhosen, pretzels, bratwurst and — of course — lots of

read more
Seven tips for your best batch of mead

Seven tips for your best batch of mead

At the end of April, we met up at the Morriss house for a special hands-on Horsemen meeting. Award-winning meadmakers John Bates and Reni Morriss walked us through the ins and outs of fermenting honey

read more
Style in Focus: Munich Helles

Style in Focus: Munich Helles

The devil is in the details with this style. It's a delicate balance in many ways. A little malty, but by no means sweet. Pleasantly full-bodied, but by no means full bodied. A little grainy, but by n

read more
Beer Recipe Design

Beer Recipe Design

Here are the slides for the discussion that Greg lead on recipe design:

read more
Avoiding sticky situations when brewing with adjuncts

Avoiding sticky situations when brewing with adjuncts

Q: How do I prevent a stuck mash when brewing with adjuncts like corn or wheat? A: Picture a perfect brew day. Everything seems to be going right. You hit your mash temp perfectly. Everything

read more
Theories of Thiol

Theories of Thiol

[Edit May 16, 2025] Sadly, Omega no longer offers thiolized yeast to the homebrewing market.**Q: What’s the deal with this “Thiolized” yeast I ke

read more
Under Pressure: Ferment like the pros with extra CO₂

Under Pressure: Ferment like the pros with extra CO₂

The hobby of homebrewing is loaded with what most brewers love; fads, innovations, different processes and best of all, new pieces of equipment and gadgets. However, all those are just tools, and it i

read more
Making a healthy yeast starter

Making a healthy yeast starter

I want to let you know how I do my yeast propagation and storage. To harvest yeast, follow the instructions below for the yeast starter. Next, decant the yeast and place it in a sterile jar to save it

read more
Best beers to ferment this summer

Best beers to ferment this summer

Hot summer temperatures make for long brew days and the need for frosty cold beers. But some of the most refreshing beers ferment at icy-cold temperatures. For brewers without consistent temperature c

read more